
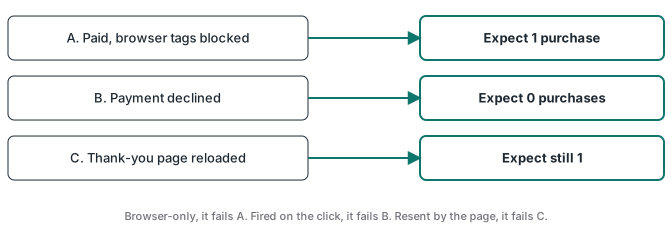
A purchase event should fire when your payment processor confirms the payment, not when a thank-you page loads or someone clicks Pay. You can find out which one yours does with three test checkouts: pay with every browser tag blocked, pay with a card that gets declined, and reload the thank-you page after a good payment. A purchase event tied to the payment shows 1, 0 and still 1 purchase at the destination. Anything else tells you what your tag depends on.
The test works on any checkout and any destination, and it doesn’t need code. Run it before you trust your purchase numbers, and before you decide whether a server-side build is worth it.
Why the trigger decides what you count
A thank-you page view proves that a browser loaded a URL. Stripe’s own docs say why it can’t stand in for one: “You can’t rely on triggering fulfillment only from your checkout landing page, because your customers aren’t guaranteed to visit that page. For example, someone can pay successfully and then lose their connection to the internet before your landing page loads.” A tag on that page has the same problem. It also needs the browser to let the tag run, and the session to survive the trip through checkout.
A click on Pay proves even less. It records an attempt. If the bank declines the card, the click still happened, and a tag fired on it has already reported a sale that never paid.
The payment processor is the only system that knows the payment went through. A purchase sent from its confirmation, usually a webhook to your server, can count each paid order once, whether or not the buyer comes back.
Step 1: find what fires your purchase today
Open Google Tag Manager’s Preview and complete a purchase in your test setup. In Tag Assistant, click through the events in the left-hand timeline until your purchase tag shows under Tags Fired. The event it fired on tells you what it depends on.
Two caveats before you trust this step. Preview runs your current workspace draft, not necessarily what’s live; Google’s preview help shows how to preview the published version from Versions instead. And GTM only sees tags inside the container. A Pixel or Google tag hardcoded in the theme, or added by a platform app, sends purchases that never show in Preview, so check the page source and the Network panel too.
| What you see in Preview | What your purchase depends on |
|---|---|
| Fired on Container Loaded, DOM Ready or Window Loaded, with a trigger on the thank-you URL | The buyer loading the thank-you page |
| Fired on a Click event, with a trigger on the Pay or Place order button | A click, paid or not |
Fired on a custom event, such as purchase, that the thank-you page pushes when it renders |
Still the page load, because the page sends the push |
| Doesn’t fire in the web container, but the destination still gets a purchase | A hardcoded tag, a platform app, or something server-side such as a webhook. Run the tests anyway |
Write down what you found. The tests in step 2 confirm it, and they also catch the case where two setups send the same purchase.
Step 2: run three test checkouts
Use your processor’s test mode, or a low-value real order you’re happy to keep in the books. These tests use card payments, which succeed or fail on the spot. Delayed methods such as bank debits start as pending and pay or fail later, so for those the purchase has to come from the processor’s paid event (on Stripe, checkout.session.async_payment_succeeded), and a test needs to wait for it.
Keep three views open while you test:
- The browser’s Network panel. Filter for
collectto see GA4 requests andtrfor Meta Pixel requests. With a server-side GTM container on your own domain, filter for that domain instead. - GA4 DebugView. Google’s help says you can turn on debug mode for your own device through Tag Assistant or GTM’s preview mode. It also warns that events are not visible in debug mode if consent mode is on and analytics consent wasn’t given, so accept your banner first.
- Meta Events Manager, on the Test events tab of your dataset, if you send purchases to Meta. Server events only show there when your server sends the tab’s test ID as
test_event_code, which Meta says to remove in production.
Test A: the buyer’s browser never reports the purchase
A buyer who closes the tab, loses signal or runs a blocker looks the same to your tags: nothing comes back from their browser after they pay. You can recreate that on purpose.
In Chrome, open DevTools, then the Request conditions drawer (Command menu, “Show Request conditions”). Add a pattern for each place your tags load from or send to, such as *googletagmanager.com*, *google-analytics.com*, *connect.facebook.net*, *facebook.com/tr* and your own server-side tagging domain if you have one. Tick “Enable blocking and throttling”, reload, and buy. Blocking the thank-you URL itself isn’t a reliable way to fake a buyer who never returns: in a check on Chrome 154 on 2026-10-25, URL blocking through the DevTools protocol stopped requests made by a page but let the navigation to a blocked page URL through.
Your processor’s dashboard shows a paid order. With every browser tag blocked, a purchase that still reaches the destination came from your server. If none shows up, check that your test view can see server events at all before you conclude anything: Meta’s Test events tab needs test_event_code on the server request, and GA4 shows Measurement Protocol events in Realtime, but in DebugView only when they carry debug_mode. Your server’s log proves it sent the event, not that the destination received it. If a server event should show and still doesn’t, your purchase most likely needs the buyer’s browser, and real buyers whose browsers don’t report are missing from your numbers.
Untick “Enable blocking and throttling” before tests B and C, or the blocked tags will make both look like passes. Closing DevTools also turns blocking off, but Chrome keeps the patterns saved for next time.
Test B: the payment is declined
Pay with your processor’s decline test card. On Stripe, the generic decline card is 4000 0000 0000 0002; other processors list theirs in their testing docs. Click Pay once.
The destination should show 0 purchases. If one appears, your tag counts attempts, and the gap between reported and real revenue grows with your decline rate.
Test C: the thank-you page loads again
Complete a good payment, let the thank-you page load, then reload it twice and open the same URL in a new tab.
The destination should still show 1 purchase. Google’s transaction ID help says GA4 deduplicates repeat purchases from the same user that share a transaction ID, on web streams only. It also warns that it deduplicates all purchase events sent with an empty transaction_id="", so with an empty ID the risk runs the other way: unrelated orders collapse into one. Meta’s deduplication doc describes merging a Pixel event and a Conversions API event with the same event name and event ID sent to the same pixel within 48 hours. It doesn’t promise to merge two browser copies from a revisit, so count what each destination received rather than assuming.
| Test | Expected at the destination | If you see something else |
|---|---|---|
| A. Paid, browser tags blocked | 1 purchase | 0 means the event needs the buyer’s browser |
| B. Payment declined | 0 purchases | 1 means the event counts attempts |
| C. Thank-you page reloaded | Still 1 purchase | 2 or more means the page resends it, or two setups send it |
Step 3: check one week of real orders
The tests show the mechanism. A week of real orders shows the size. For the same 7 days and the same time zone, count:
- Paid orders in your processor or store, excluding test orders. Keep orders refunded later in the count, because the destinations received those purchases too.
- Purchases at each destination. For GA4, use distinct transaction IDs, not the event count.
Divide the second by the first. Better still, export both lists with order IDs and match them, so you see which orders are missing or extra. Some gap below 100% is normal, because consent choices and blockers keep some buyers out of browser tracking. Above 100%, the destination holds purchases your processor doesn’t have, and that is worth finding before anything else. A ratio that moves when you change your checkout, your banner or your thank-you page is a tracking problem, not a buyer trend.
What to do with the result
If all three tests pass, your purchase already follows the payment. Keep the weekly count as a monitor, the way the silent failures guide describes.
If A or B fails, move the trigger to the payment confirmation. The processor sends a webhook to your server, your server checks the payment status, and only then sends the purchase to each platform. The Stripe conversion tracking guide walks through that build with real payloads. The server event matches the ad best when it carries the click IDs and browser IDs you saved before the buyer left for checkout, which the first-party click ID index guide covers. Hashed email and phone can help too: Meta’s customer information parameters accept both for matching, with your buyer’s consent. Consent still applies to a server event: send personal data only when the buyer agreed to it.
If only C fails, the quick fix is a stable, non-empty transaction ID on every purchase, plus one owner per destination. The lasting fix is the same webhook path.
One limit stays whatever you build. If Meta puts your site in a sensitive category, such as health or finance, it can restrict the purchase events it accepts, and better tracking can’t lift that.
Sources
- Stripe Docs, Customize redirect behavior, the section “Webhooks are required for fulfillment”, checked 2026-10-25.
- Stripe Docs, Test card numbers, declined payments, checked 2026-10-25.
- Chrome for Developers, Request conditions, checked 2026-10-25.
- Google Analytics Help, Monitor events in DebugView, checked 2026-10-25.
- Google Analytics Help, Minimize duplicate key events with transaction IDs, checked 2026-10-25.
- Google Analytics Help, Data freshness, checked 2026-10-25.
- Tag Manager Help, Preview and debug containers, checked 2026-10-25.
- Stripe Docs, Fulfill orders, delayed payment methods, checked 2026-10-25.
- Meta for Developers, Handling duplicate Pixel and Conversions API events, checked 2026-10-25.
- Meta for Developers, Using the API: Test Events tool, checked 2026-10-25.
- Google for Developers, Verify a Measurement Protocol implementation, checked 2026-10-25.
- Meta for Developers, Customer information parameters, checked 2026-10-25.